Checking two exports of the same shot, a new color grade against the old one, or H.264 against HEVC usually means juggling QuickTime windows, dragging each playhead by hand and hoping you landed on the same frame. FrameSight Pro turns that into one window where every version moves together.
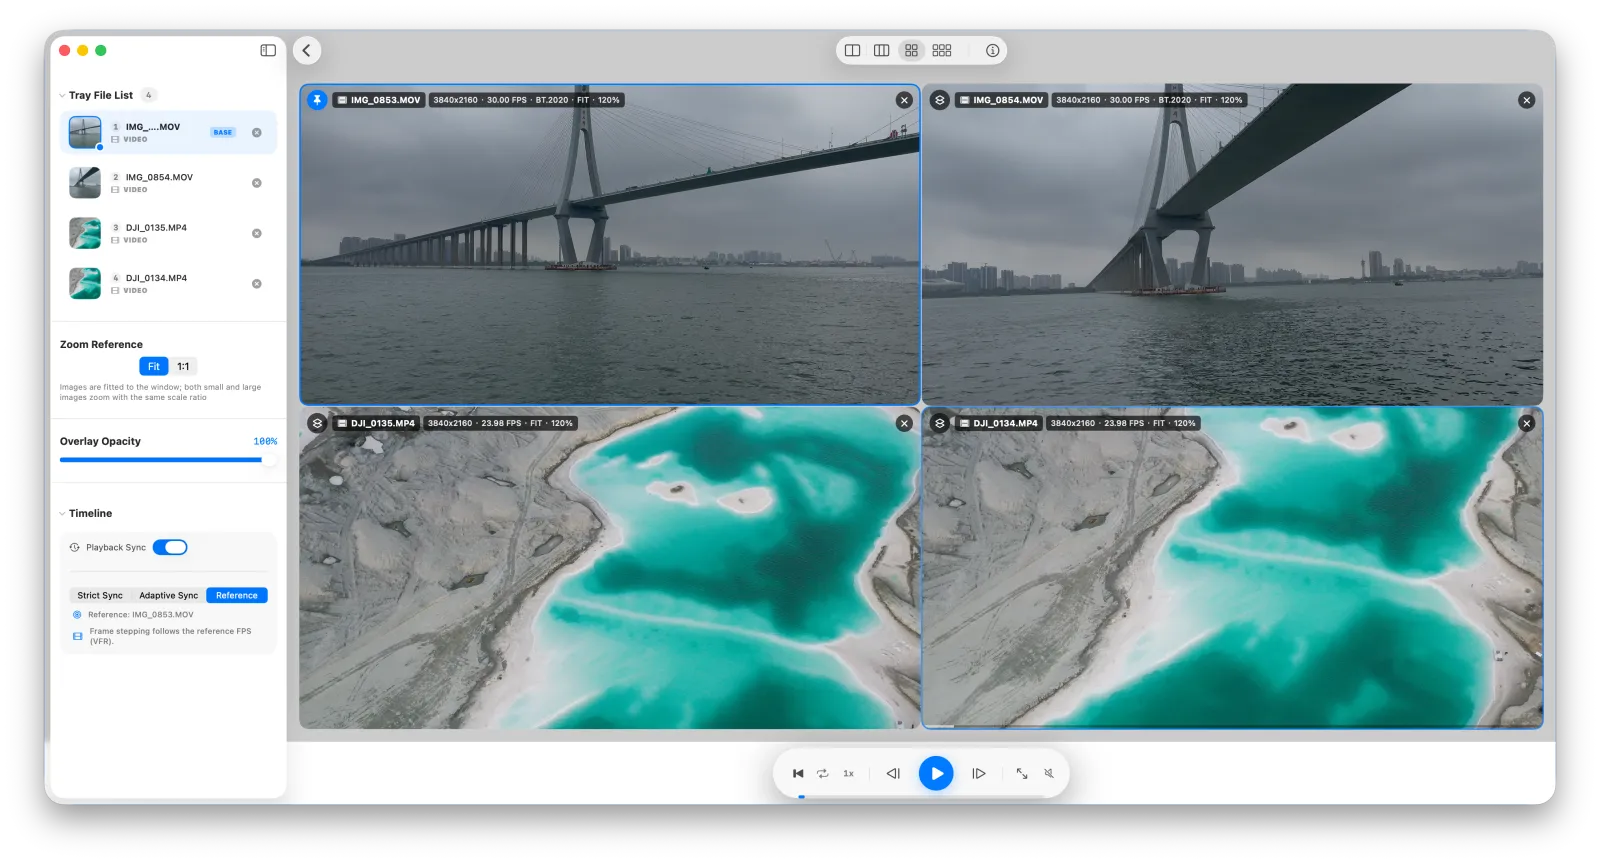
Compare videos side by side in 4 steps
- Import your clips. Drag video files or whole folders into the FrameSight Pro window, or press ⌘O / ⌘⇧O.
- Select 2–6 clips in the browser (or collect them in the Tray first).
- Press ⌘D to enter Compare mode. The layout tiles automatically based on how many clips you picked, and you can mix videos with still images.
- Play and inspect. Press Space to play or pause every clip together, drag the shared timeline to seek, and use ← / → to step one frame at a time.
Step through every version frame by frame
Pause, then press ← or →. All synced clips move backward or forward by exactly one frame, so a dropped frame, a cut that lands one frame late, or a compression artifact on a single frame shows up immediately. Frame stepping follows the frame rate of the reference clip and also works with variable frame rate (VFR) footage from phones and drones.
The playback bar under the clips also lets you jump back to the start, loop playback and change the playback speed.
Choose how clips stay in sync
Open the Timeline section in the Compare sidebar:
- Playback Sync — on by default. Turn it off to play clips independently.
- Sync Mode — pick Strict Sync, Adaptive Sync (the default) or Reference, which follows the clip you mark as the reference. This helps when versions have different frame rates or lengths.
Zoom into the same detail in every clip
Zoom with ⌥ + scroll and drag to pan. Every other clip follows to the same region, which makes it easy to compare noise, sharpening, banding or text legibility at 1:1. Use Zoom Reference in the sidebar to switch between Fit (all clips scaled to the window) and 1:1 (original pixel size). Each tile shows the clip's resolution, frame rate and color space, and ⌘I opens the info panel with more detail.
What people use it for
- Delivery and export QA — confirm that the final export matches the approved version before it goes out.
- Codec and bitrate tests — compare H.264, HEVC and ProRes renders, or several bitrates of the same master.
- Color grading reviews — play grade A and grade B next to the original, locked to the same frame.
- Camera and phone comparisons — review footage from different devices or stabilization settings shot at the same time.
When you find the keepers, add them to the Tray with A and export them in one step with ⌘⇧E.
Other ways to compare videos on a Mac
| Approach | Good for | Limitations for version review |
|---|---|---|
| Several QuickTime Player windows | Quick look at one or two files, already on every Mac | Each window plays, seeks and zooms on its own, so you line up frames by hand |
| A video editing timeline | Stacking clips when you are already editing the project | Needs a project, import and layout work just to look at a few files |
| FrameSight Pro | Reviewing 2–6 versions of the same content quickly | Focused on viewing and comparing — it does not edit, trim or re-encode video |
For a detailed look at the built-in apps, see FrameSight Pro vs Preview and QuickTime.
Free vs Pro: the free Lite tier compares 2 items side by side with full playback sync and frame stepping. Pro unlocks 3–6 items at once, plus DNG (RAW) and PSD support, and can be tried free for 14 days.
Frequently Asked Questions
Can I compare two videos side by side on a Mac for free?
Yes. FrameSight Pro is free to download, and the free Lite tier compares two items side by side, including two videos with synchronized playback and frame stepping. Comparing 3–6 items at once requires Pro, which you can try free for 14 days.
How do I step through several videos frame by frame at the same time?
In Compare mode, pause playback and press the Left or Right arrow key. Every synced clip moves one frame backward or forward together. Frame stepping follows the frame rate of the reference video, including variable frame rate footage.
What if my videos have different frame rates or lengths?
The Timeline panel lets you choose Strict Sync, Adaptive Sync or follow a Reference video, and you can pick which clip is the reference. You can also turn Playback Sync off if you want to play the clips independently.
Which video formats can I compare?
MOV, MP4 and M4V files using codecs that macOS decodes natively, such as H.264, HEVC (H.265) and Apple ProRes. AV1 works on Macs with hardware AV1 decoding (Apple M3 or later).
Are my videos uploaded anywhere?
No. FrameSight Pro plays and decodes everything locally on your Mac inside the macOS App Sandbox. No media or personal data is collected or uploaded.